

(Updated for Swift 3)
As we already know, Swift is Apple’s next generation programing language and it is a replacement for Objective C. After its introduction at Apple’s WWDC 2014, developers started to learn and explore the new language. However we all know that changing a programming language needs serious effort and it will take time to completely replace Objective C with Swift. During this transformation we will learn how to use Swift code with our existing Objective C codes in the same project and vice versa.
As many of the current iOS projects do, VideoKit is coded fully with Objective C.
So what if you plan to start a new project and want to use Swift as the programming language, or you want to add VideoKit to your existing Swift project?
Don’t worry, it’s quite easy to use Objective C and Swift together with XCode.
Here’s a step by step guide on how to use VideoKit with your new Swift project.
Before you start, make sure that you have downloaded Videokit & VideoKitSample and have them in your download folder.
Now let’s make a new Xcode project with Swift :
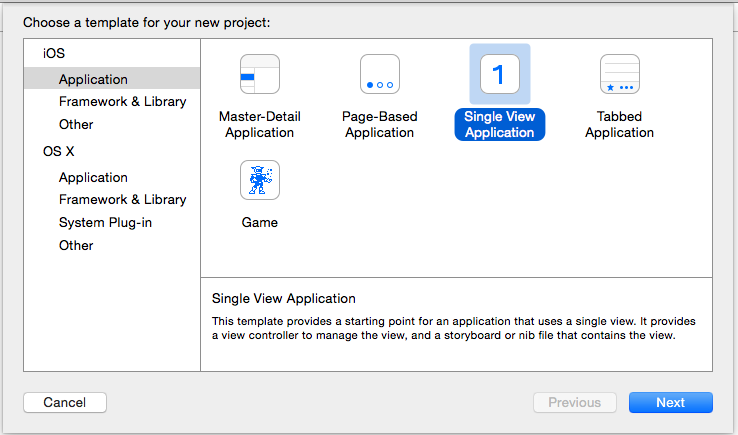
* Open Xcode and select File -> New Project and select Single View Application as follows :
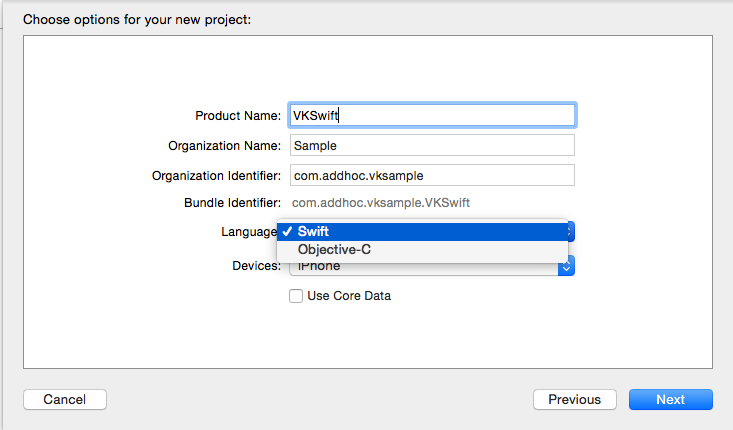
* Enter project name in this example “VKSwift” select language as “Swift” and press “Next”
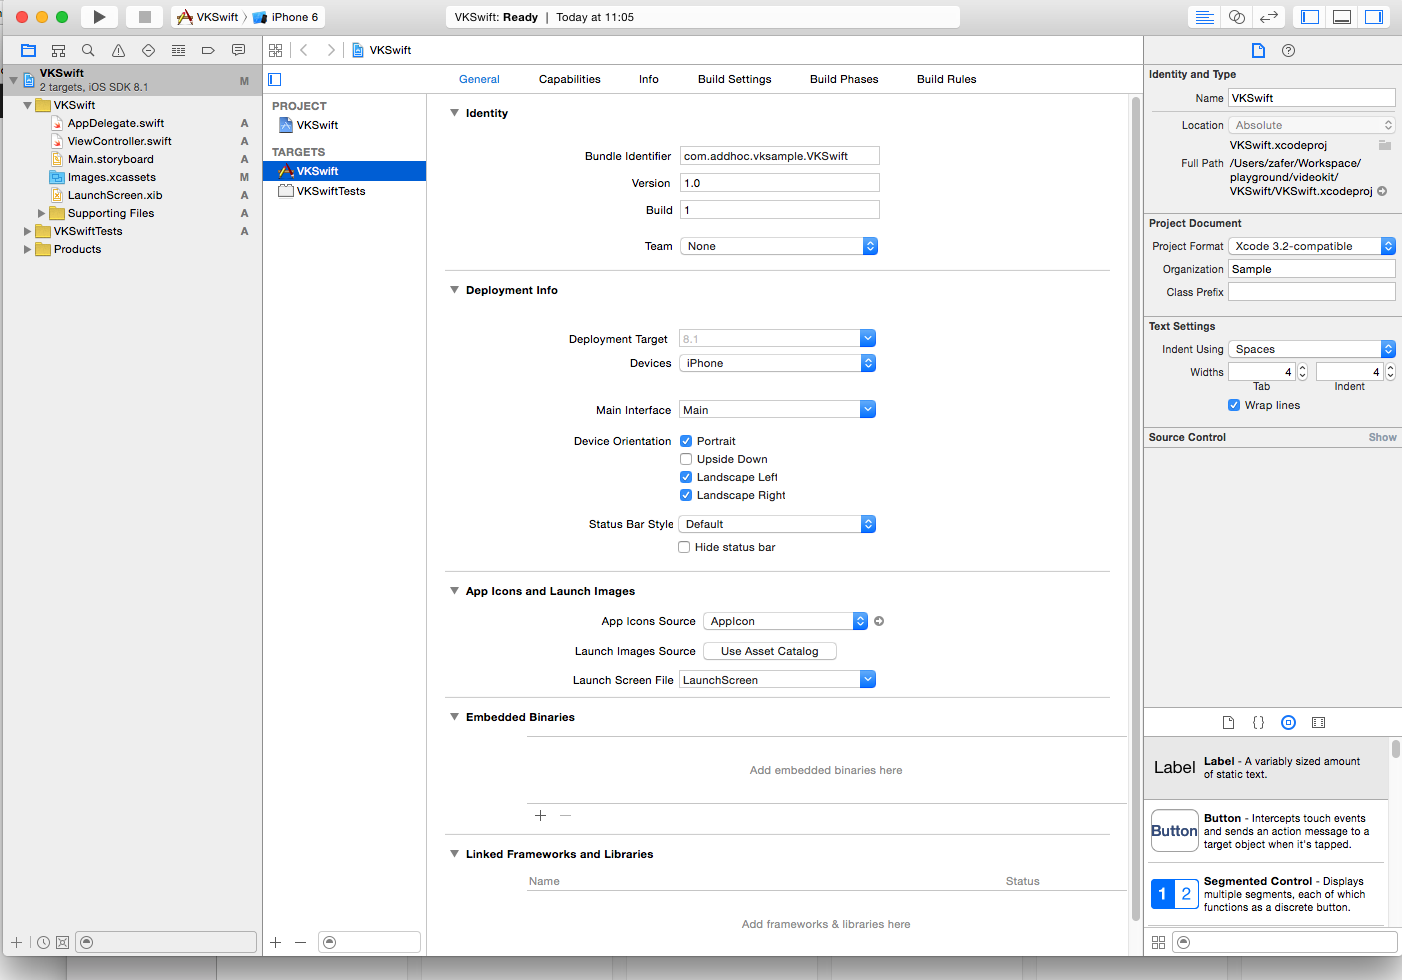
* Select a folder for your project and press “Create”. At the end you will have an empty Swift project like this
Now we will see how to import existing VideoKit to our new project.
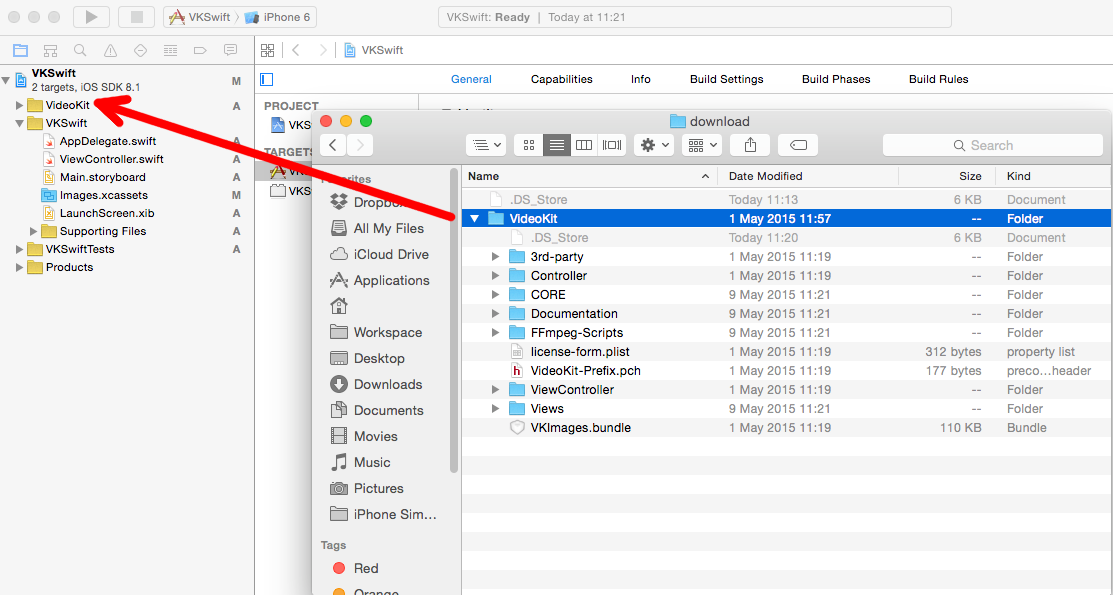
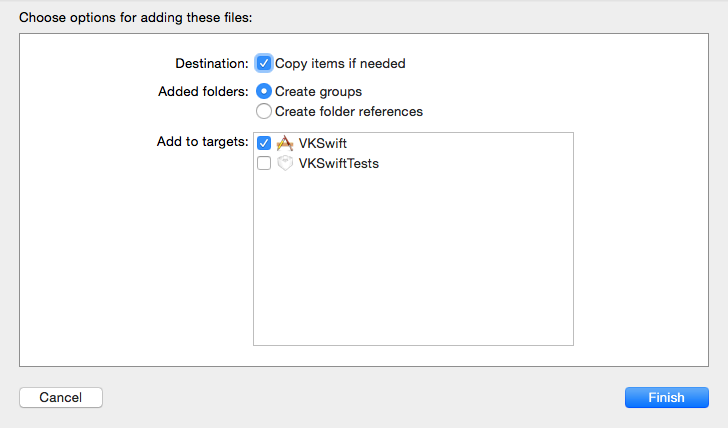
* Add VideoKit folder to the new project as shown below.
* Select “Copy items if needed” and select your target “VKSwift”
* Now add frameworks and libraries that are needed by VideoKit, as you already know:
From “General” tab of your target, click the plus icon in “Linked Frameworks and Libraries” and add :
1. libz
2. libiconv
2. QuartzCore
3. SystemConfiguration
4. MediaPlayer
5. OpenGLES
6. AudioToolbox
7. AVFoundation
At the and it will look like this :

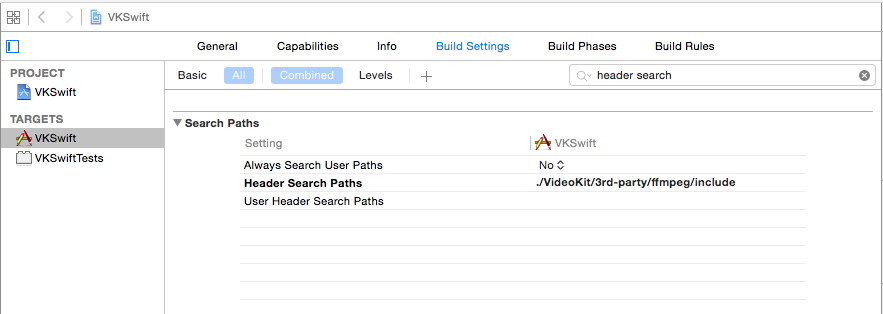
* Select your target again, and go to “Build Settings” tab, Find “Header Search Paths” and set it as below
./VideoKit/3rd-party/ffmpeg/include
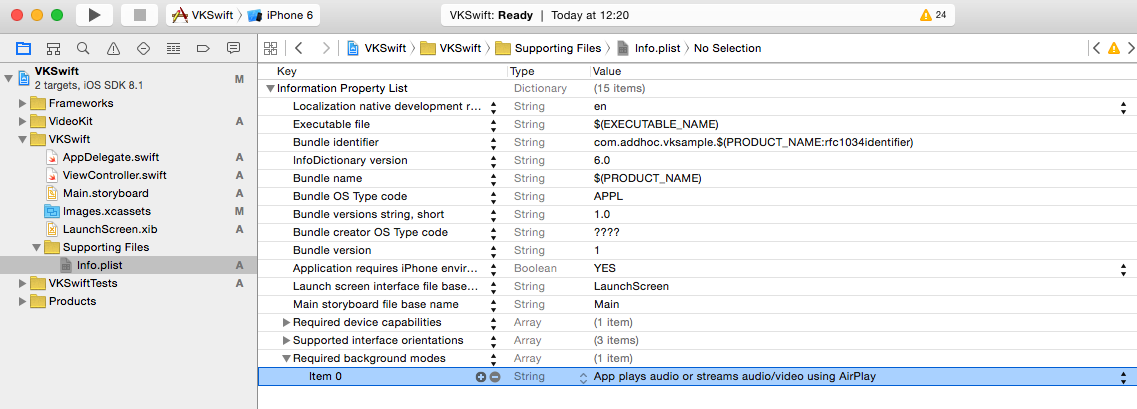
* Now, add the ‘Required Background Modes’ key to your plist file and set item 0’s value to “App plays audio”
* VideoKit is a non ARC library but it can used any ARC or non-ARC projects. It can be added to non-ARC project without doing anything.For ARC enabled projects, after adding VideoKit to project,
Go to Targets -> Build Phases -> Compile Sources, double click on the right column of the row under Compiler Flags (It can also be added it to multiple files by holding the cmd button to select the files and then pressing enter to bring up the flag edit box.)
-fno-objc-arc
Write above compiler flag into the box.
Now we will do the integration:
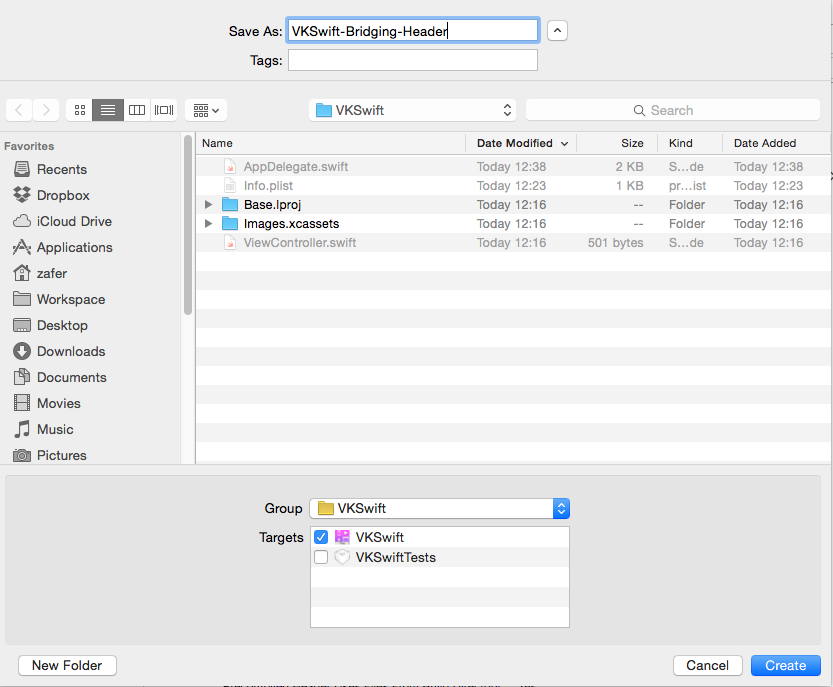
* Click on “Resources” group and Create a new header file as shown :
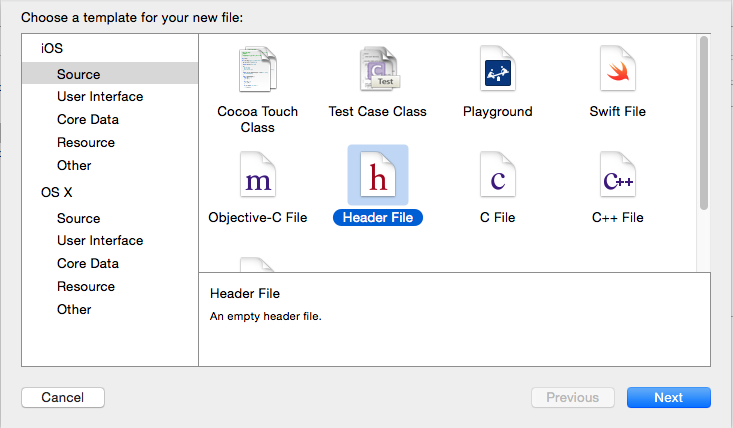
* Name the header file as VKSwift-Bridging-Heder.h as it has to be in the format <#YourProjectName#>-Bridging-Header.h, as follows, select “VKSwift” as target and press “Create”.
Now we created our bridging header file, as the name implies it is a header file like a bridge between Objective-C and swift. We will later add the header files that we will use in our swift sources in this header file.
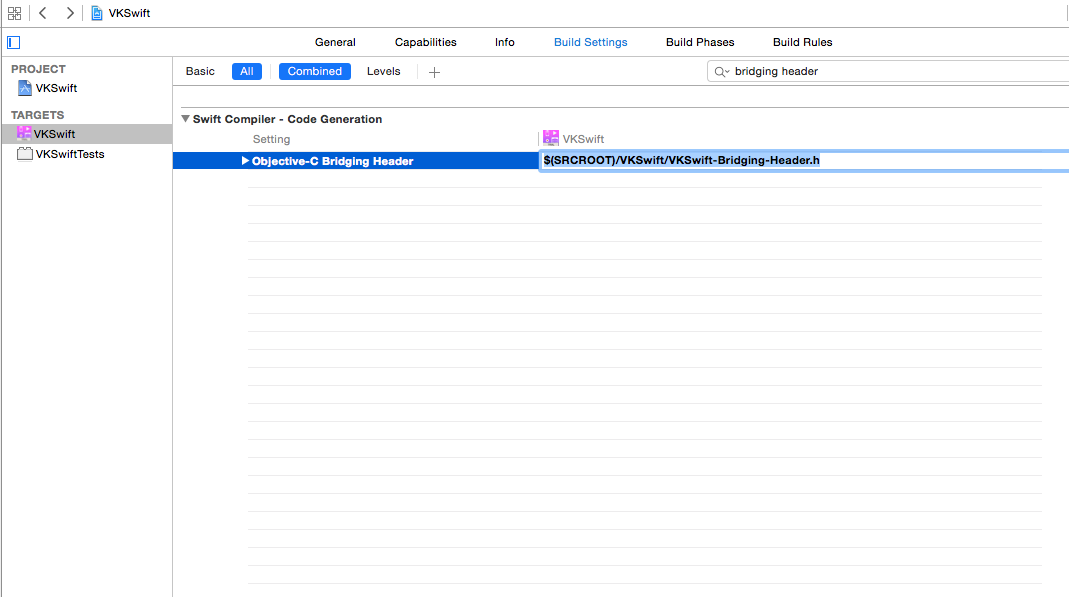
* The next thing is tell Xcode about our bridging header file. Select your target and go to build settings. Then set “Objective-C Bridging Header” property to following :
– $(SRCROOT)/VKSwift/VKSwift-Bridging-Header.h
* We also need to add prefix header path, go to “Build Settings” tab and set the value of “Prefix Header” property as follows :
– $(SRCROOT)/VideoKitSample/VideoKitSample-Prefix.pch
The contents of the prefix header is as follows:
#ifdef __OBJC__

#import <UIKit/UIKit.h>

#import <Foundation/Foundation.h>

#endif

* We added all resources to our project and made the integration, now we will use them in our swift project.
* First open our bridging header file that we previously created, and add these header files that we will use as follows :
#import "VKPlayerViewController.h"

#import "VKDecodeManager.h"

#import "VKPlayerController.h"
* Our sample swift project will consist of a tab view with 2 view controllers, one of them will be FullScreenViewController and the other one will be EmbeddedViewController. Let’s now create these view controllers and add them to our sample project. We are starting with creating FullScreenViewController.
From XCode choose File->New File->Cocoa Touch Class and give it a name as FullScreenViewController.
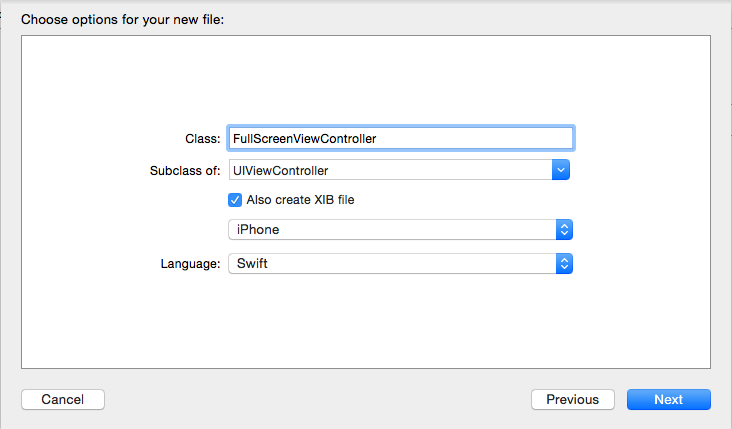
Select language as Swift and also don’t forget to check Also create XIB File option.
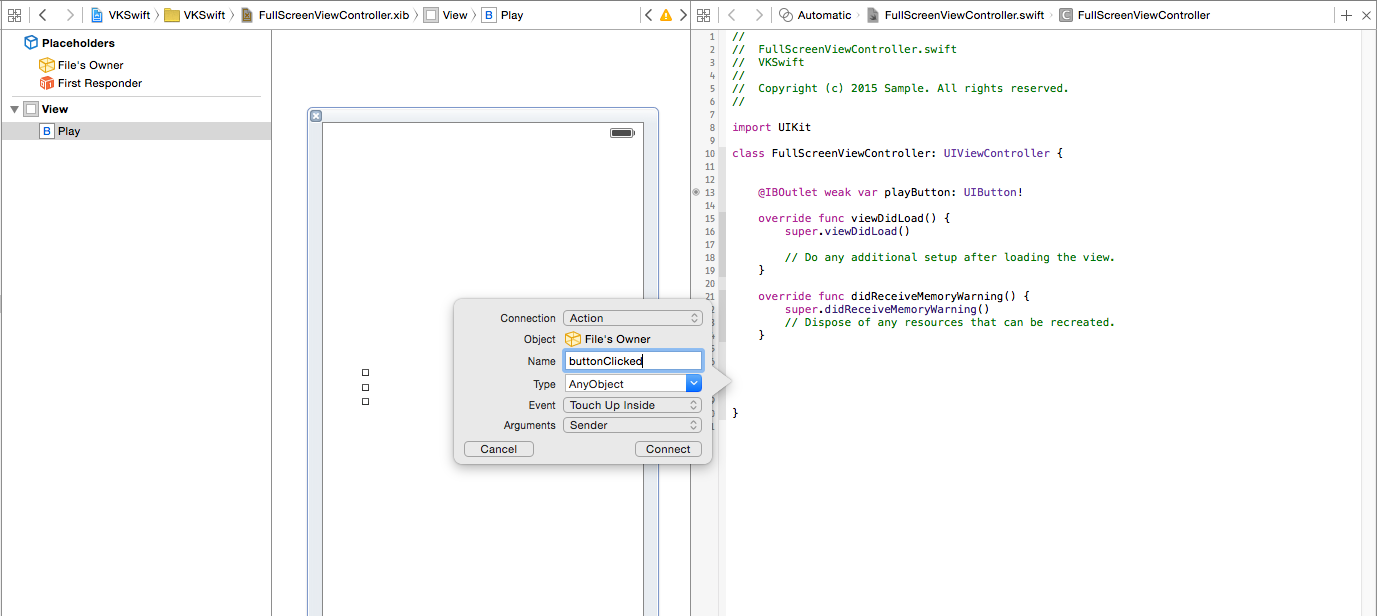
After creating FullScreenViewController add a button and connect an IBOutlet as playButton.
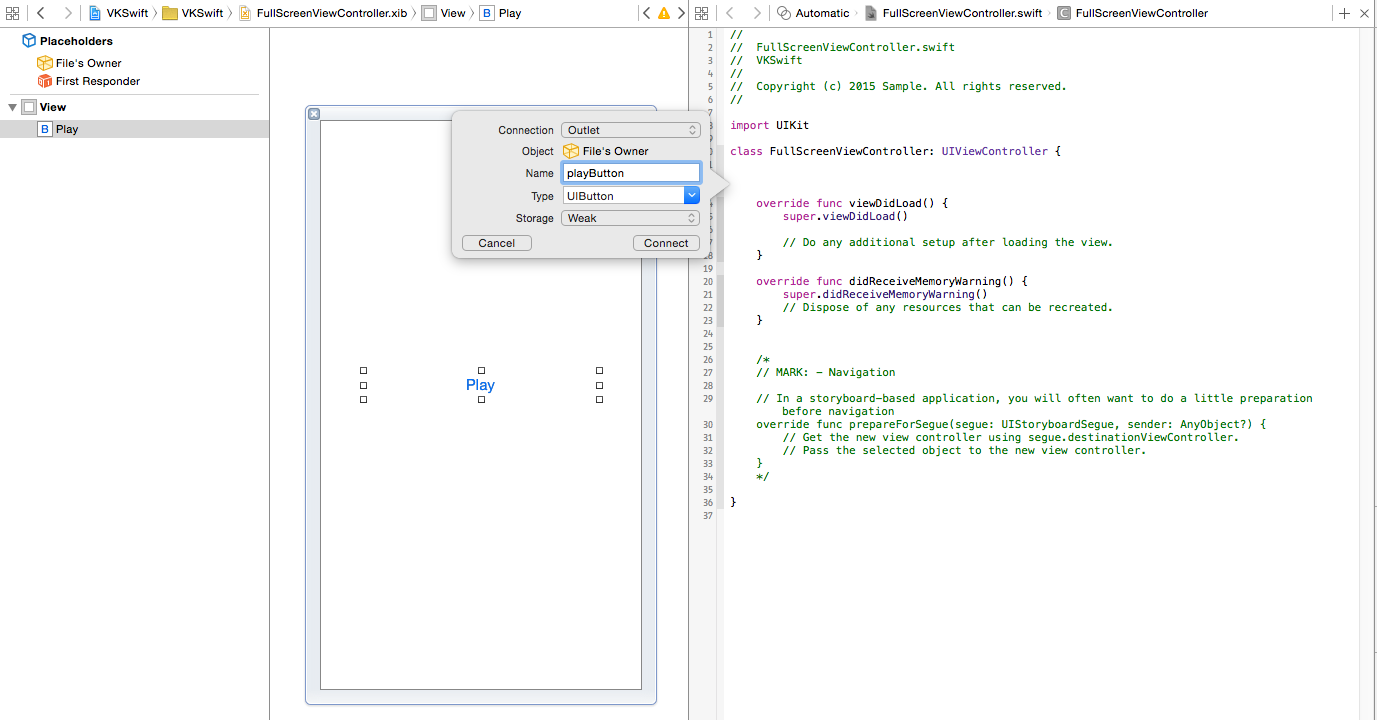
Add an IBAction as buttonClicked, now we will see how to initialize and call VKPlayerViewController when we click playButton.
Open FullScreenViewController file and fill it approprietly as follows.
What we do inside the methods is:
viewDidLoad : Set tabBarItem title as Fullscreen
buttonClicked : We are setting decoder options dictionary to options, url that we want to stream to urlString parameters and initializing VKPlayerViewController. Then we present the view and the video is streamed, that’s it.
import UIKit

class FullScreenViewController: UIViewController,VKPlayerViewControllerDelegate {

@IBOutlet weak var playButton: UIButton!
override func viewDidLoad() {
super.viewDidLoad()
self.tabBarItem.title = "Fullscreen"
}
@IBAction func buttonClicked(sender: AnyObject) {
let urlString = "rtsp://ws2.gpom.com/cartoon"
var options : Dictionary<String,String> = [VKDECODER_OPT_VALUE_RTSP_TRANSPORT_TCP:VKDECODER_OPT_KEY_RTSP_TRANSPORT]
var vkPlayerViewController:VKPlayerViewController = VKPlayerViewController(urlString: urlString, decoderOptions: options)
vkPlayerViewController.barTitle = "Cartoon Channel"
vkPlayerViewController.statusBarHidden = true
vkPlayerViewController.delegate = self
self.present(vkPlayerViewController, animated: true, completion: nil)
}
}
After FullScreenViewController, we are creating the EmbeddedViewController.
From XCode choose File->New File->Cocoa Touch Class and give it a name as EmbeddedViewController.

Select language as Swift and also don’t forget to check Also create XIB File option.
After creating EmbeddedViewController add a button and connect an IBOutlet as playButton and add an IBAction as buttonPlayClicked.

Open EmbeddedViewController file and fill it approprietly as follows.
What we do inside the methods is:
init : Overrided init(nibName nibNameOrNil: String?, bundle nibBundleOrNil: NSBundle?) to set tabBarItem title and also added the other required initializers.
buttonClicked : We check for vkPlayerController and if it is nil then we create an instance by setting url that we want to stream to urlString parameter. To show it in the current view it as embedded, we set its frame and add it to current view sa a subview. We set the decoder options dictionary and then we call play() to start playing the stream. The video is streamed, that’s it.
import UIKit

class EmbeddedViewController: UIViewController {

@IBOutlet weak var buttonPlay: UIButton!

var vkPlayerController: VKPlayerController?

override init() {

super.init()

}

required init(coder aDecoder: NSCoder) {

super.init(coder: aDecoder)

}

override init(nibName nibNameOrNil: String?, bundle nibBundleOrNil: Bundle?) {

super.init(nibName: nibNameOrNil, bundle: nibBundleOrNil)

self.tabBarItem.title = "Embedded"

}

override func viewDidLoad() {

super.viewDidLoad()

}
@IBAction func buttonPlayClicked(sender: AnyObject) {
let urlString = "rtsp://ws2.gpom.com/cartoon"
if vkPlayerController==nil {
vkPlayerController = VKPlayerController(urlString: urlString)
vkPlayerController!.view.frame = CGRect(x: 28.0, y: 38.0, width: 264.0, height: 167.0)
self.view.addSubview(vkPlayerController!.view)
}
vkPlayerController?.contentURLString = urlString
var options : Dictionary<String,String> = [VKDECODER_OPT_VALUE_RTSP_TRANSPORT_TCP:VKDECODER_OPT_KEY_RTSP_TRANSPORT]
vkPlayerController?.decoderOptions = options;
vkPlayerController?.play()
}
}
* After adding FullScreenViewController and EmbeddedViewController, open AppDelegate.swift file and add the variables that we will use under the class declaration :
var window: UIWindow?

var fullScreenSampleViewController: FullScreenViewController?

var embeddedSampleViewController: EmbeddedViewController?

var tabBarController: UITabBarController?

var navbarVc : UINavigationController?
* And change the content of the function “application-didFinishLaunchingWithOptions” as this to create a tabbar controller with FullScreenViewController and EmbeddedViewController:
self.window = UIWindow()

self.window?.frame = UIScreen.main.bounds

self.tabBarController = UITabBarController()

self.tabBarController?.tabBar.tintColor = UIColor.darkGray

self.fullScreenSampleViewController = FullScreenViewController(nibName: "FullScreenViewController", bundle: nil)

self.embeddedSampleViewController = EmbeddedViewController(nibName: "EmbeddedViewController", bundle: nil)

self.tabBarController?.viewControllers = (NSArray(objects: self.fullScreenSampleViewController!,self.embeddedSampleViewController!) as! [UIViewController])

self.window?.rootViewController = self.tabBarController

self.window?.makeKeyAndVisible()

return true

And that’s it, now you have a Swift project that uses VideoKit.
You can now add your own Swift classes and other resources as you wish… Also, you can download the project of above tutorial in our download page by filling the subscription form.
Hope you enjoyed the tutorial…